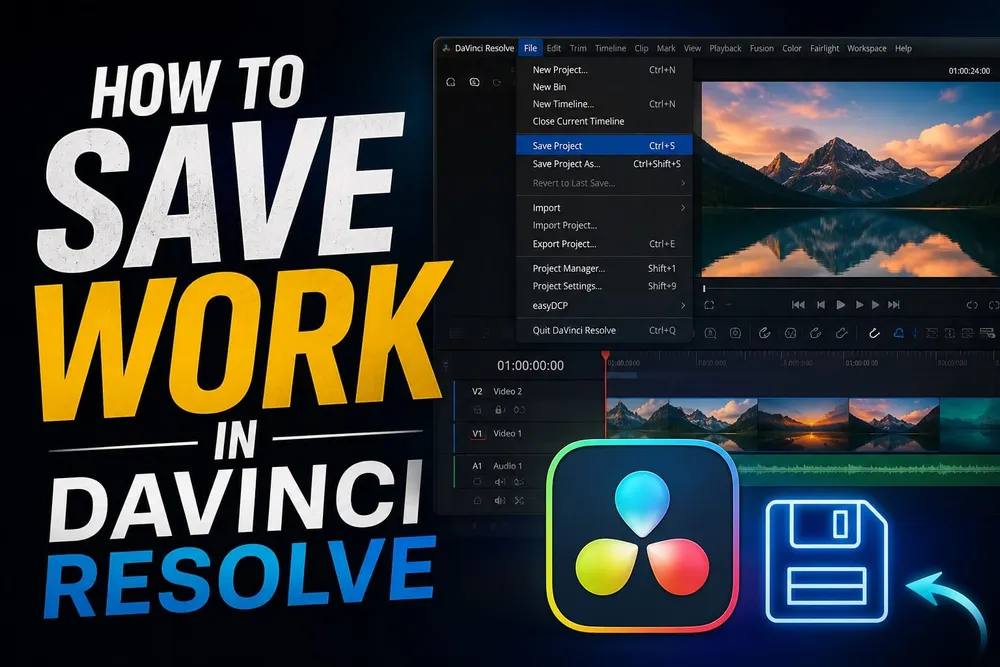
Press Ctrl+S on Windows/Linux or Cmd+S on macOS to save your DaVinci Resolve project. Resolve stores the working project in a Project Library. Keep Live Save on for ongoing changes, enable scheduled backups for earlier versions, and export a DRP or DRA when you need a separate copy.
For a first-project routine, use the DaVinci Resolve tutorial path. This guide covers saving and rollback. Library locations and migration have their own guide below.
Where the saved project lives
Resolve stores working projects inside a Project Library rather than asking you to save a normal project file for every session. A library can be local, networked or in Blackmagic Cloud, and each type has different storage and connectivity risks.
Do not rely on a copied path from another computer. In Project Manager, open the Project Libraries sidebar and inspect the active library. For the on-disk details, use Where DaVinci Resolve Projects Are Saved; if Project Manager itself is unfamiliar, start with the DaVinci Resolve beginner tutorial.
For a local library, use its Back Up command rather than copying individual database files while Resolve is running. For a managed network library, use Resolve's tools or your administrator's backup procedure. Neither a library backup nor a DRP replaces a backup of your source media.
How to Save a Project with Live Save
Live Save incrementally saves changes without user action. The Resolve 21 saving documentation says it's enabled by default. Cut, Edit and Fairlight changes save as you make them; Fusion and Color changes save when you switch clips and periodically in the background. Collaborative projects keep Live Save on and don't allow it to be disabled.
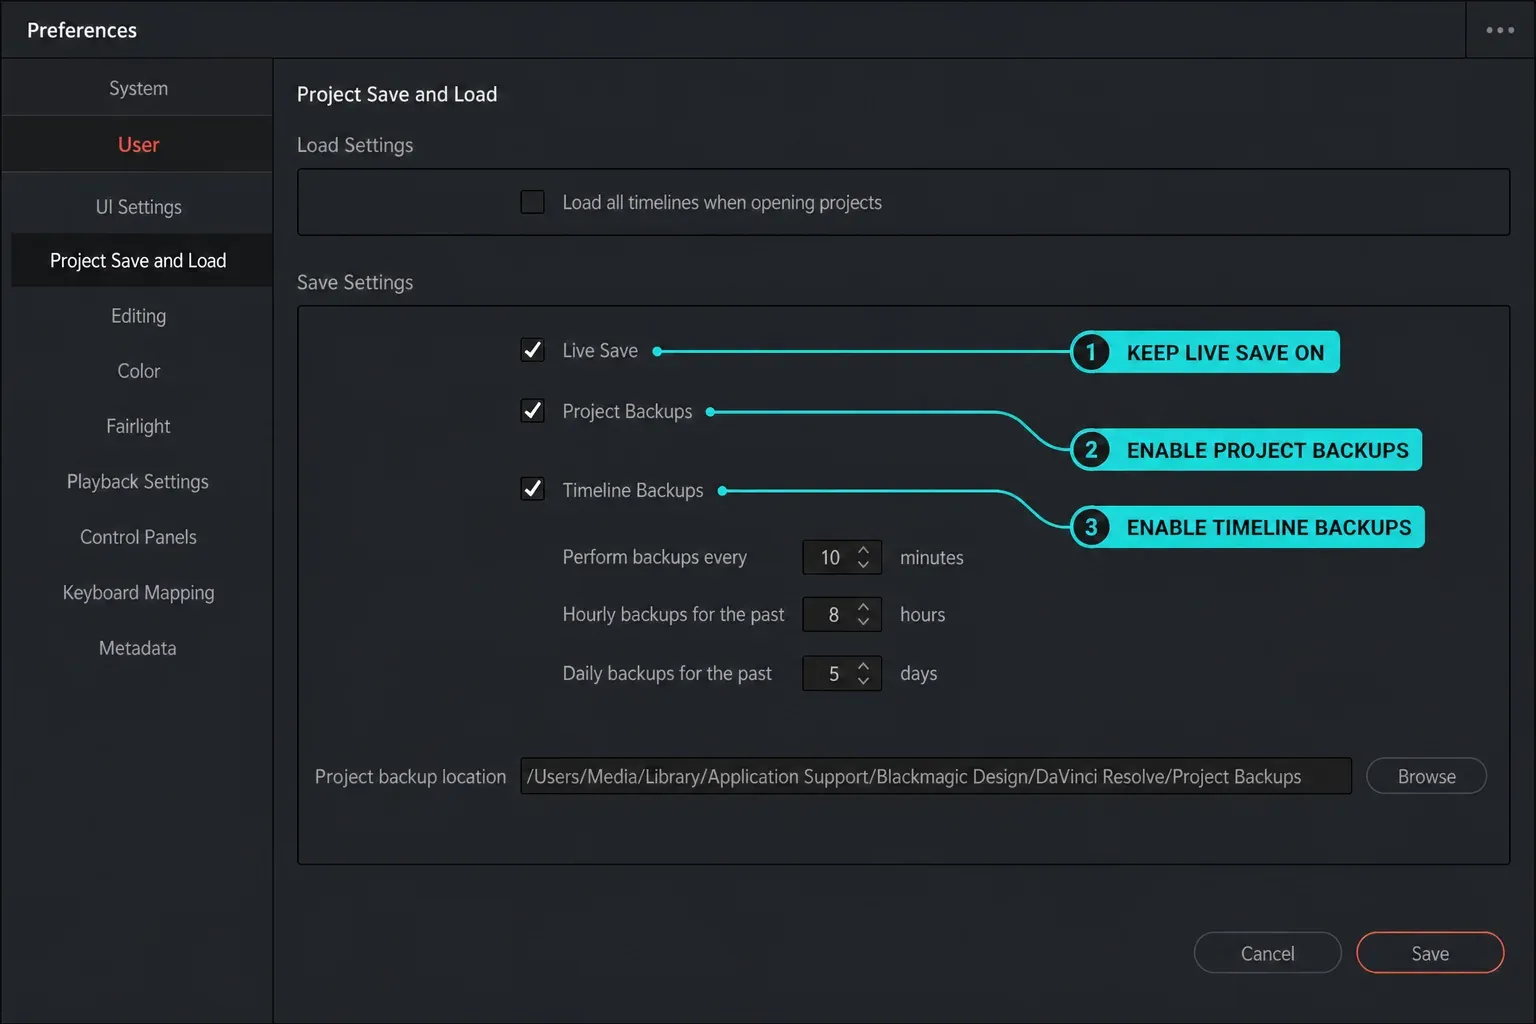
Check it under:
- Open DaVinci Resolve > Preferences
- Select User > Project Save and Load
- Confirm Live Save is enabled
- Click Save after changing the preference
File > Save Project or Ctrl+S on Windows/Linux and Cmd+S on macOS still performs a manual save. With Live Save enabled, that shortcut is a confirmation habit, not a version history.
For a separate working version in the same library, choose File > Save Project As and enter a unique name. If Resolve asks to overwrite an existing project, cancel and choose another name. This creates a project copy, not an independent media backup.
Keep Live Save enabled for everyday editing. If you deliberately disable it, save manually before closing the project. File > Revert to Last Save Version discards unsaved changes, so don't use it as a substitute for loading a dated backup. The Edited indicator beside the project name marks unsaved work.
Enable Project Backups and load an earlier version
Live Save preserves the latest state; it can't take you back through a chain of already saved decisions. Project Backups create independent, dated copies for that job.
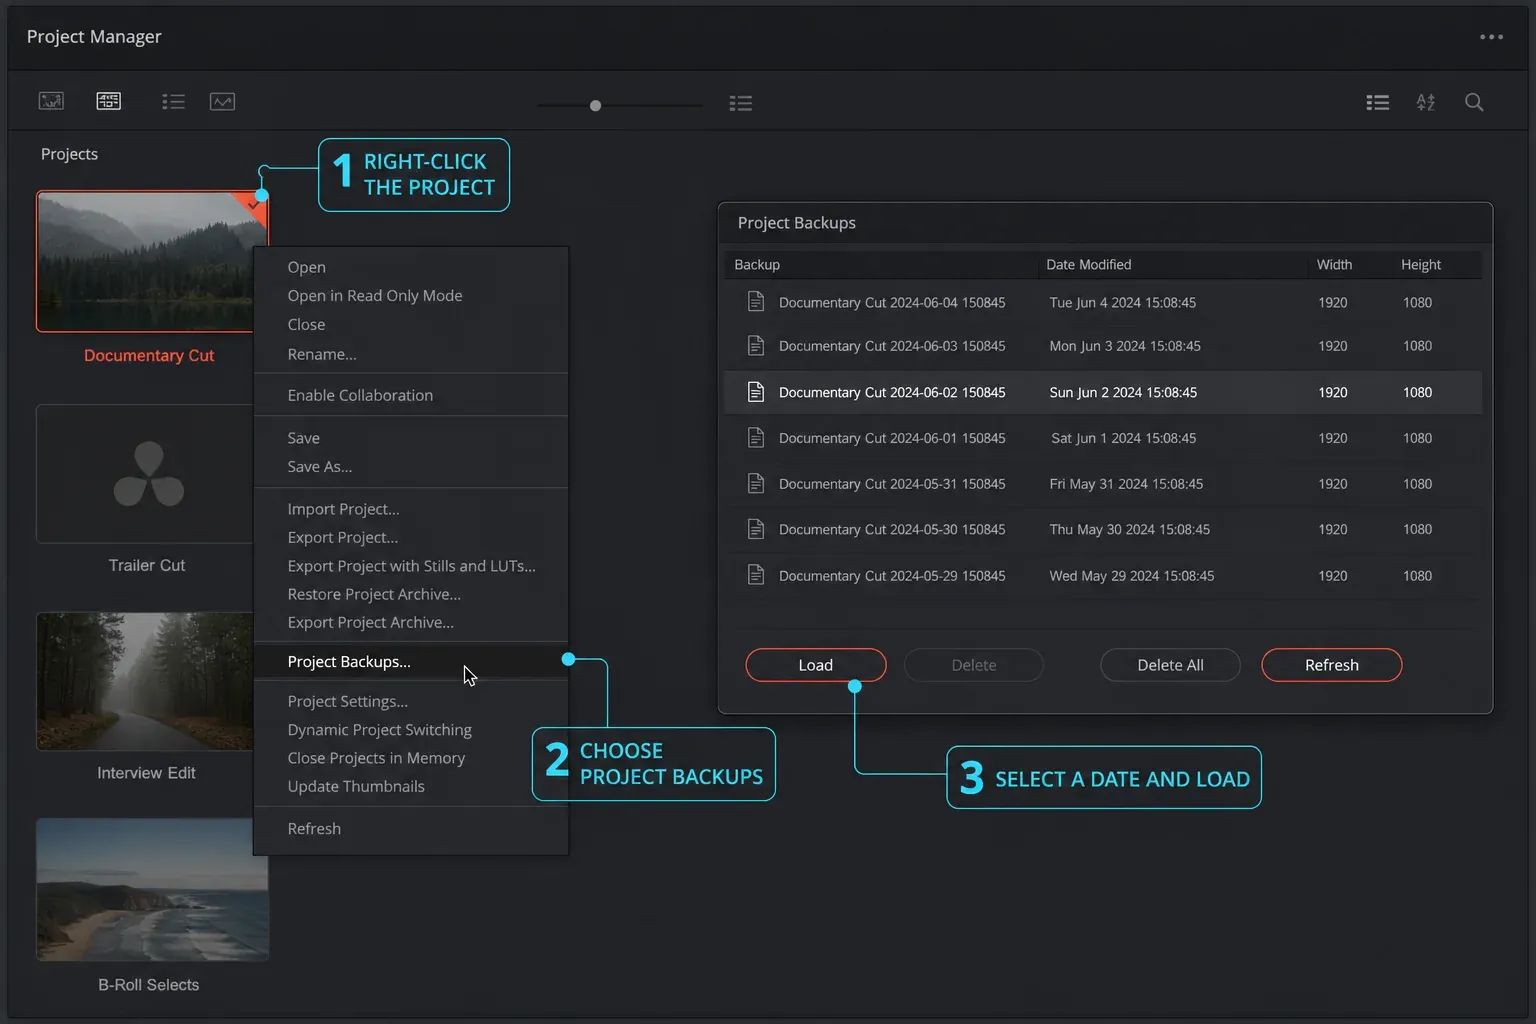
Project Backups rotate through minute, hourly and daily retention. Older snapshots eventually expire; export a dated DRP for a milestone you want to keep. Each scheduled backup contains project data but excludes Gallery stills, LUTs and source media. Preserve those assets separately or choose an export option that includes the stills and LUTs.
To enable Project Backups:
- Open DaVinci Resolve > Preferences > User > Project Save and Load
- Enable Project Backups
- Set minute, hourly and daily retention for the project
- Choose a writable backup location, preferably on storage independent of the active library
- Click Save and later confirm that backups appear in Project Manager
To restore, open Project Manager, right-click the project and choose Project Backups. Select a dated backup and click Load. Resolve opens it as an independent project instead of overwriting the original; rename it clearly before continuing work.
Live Save and Project Backups operate independently and should normally run together: one protects the current state, while the other preserves earlier states.
If the backup list is empty, confirm Project Backups is enabled, its destination is connected and writable, and you've edited long enough for the configured interval. Sitting idle doesn't create new useful generations. Click Refresh in the backup list. Turning backups on after a loss can't recreate earlier edits.
For a Blackmagic Cloud library, check its separate Cloud Project Server backup controls. Open the library’s Backups tab and verify the dated backups there. Do not assume that enabling Project Backups in Resolve proves a Cloud project has a recoverable copy. Keep dated DRP exports outside the library too.
Restore one timeline without replacing the current edit
Timeline Backups use the same rotating schedule but preserve individual timelines. They're useful when one edit sequence is damaged and the rest of the project should remain untouched.
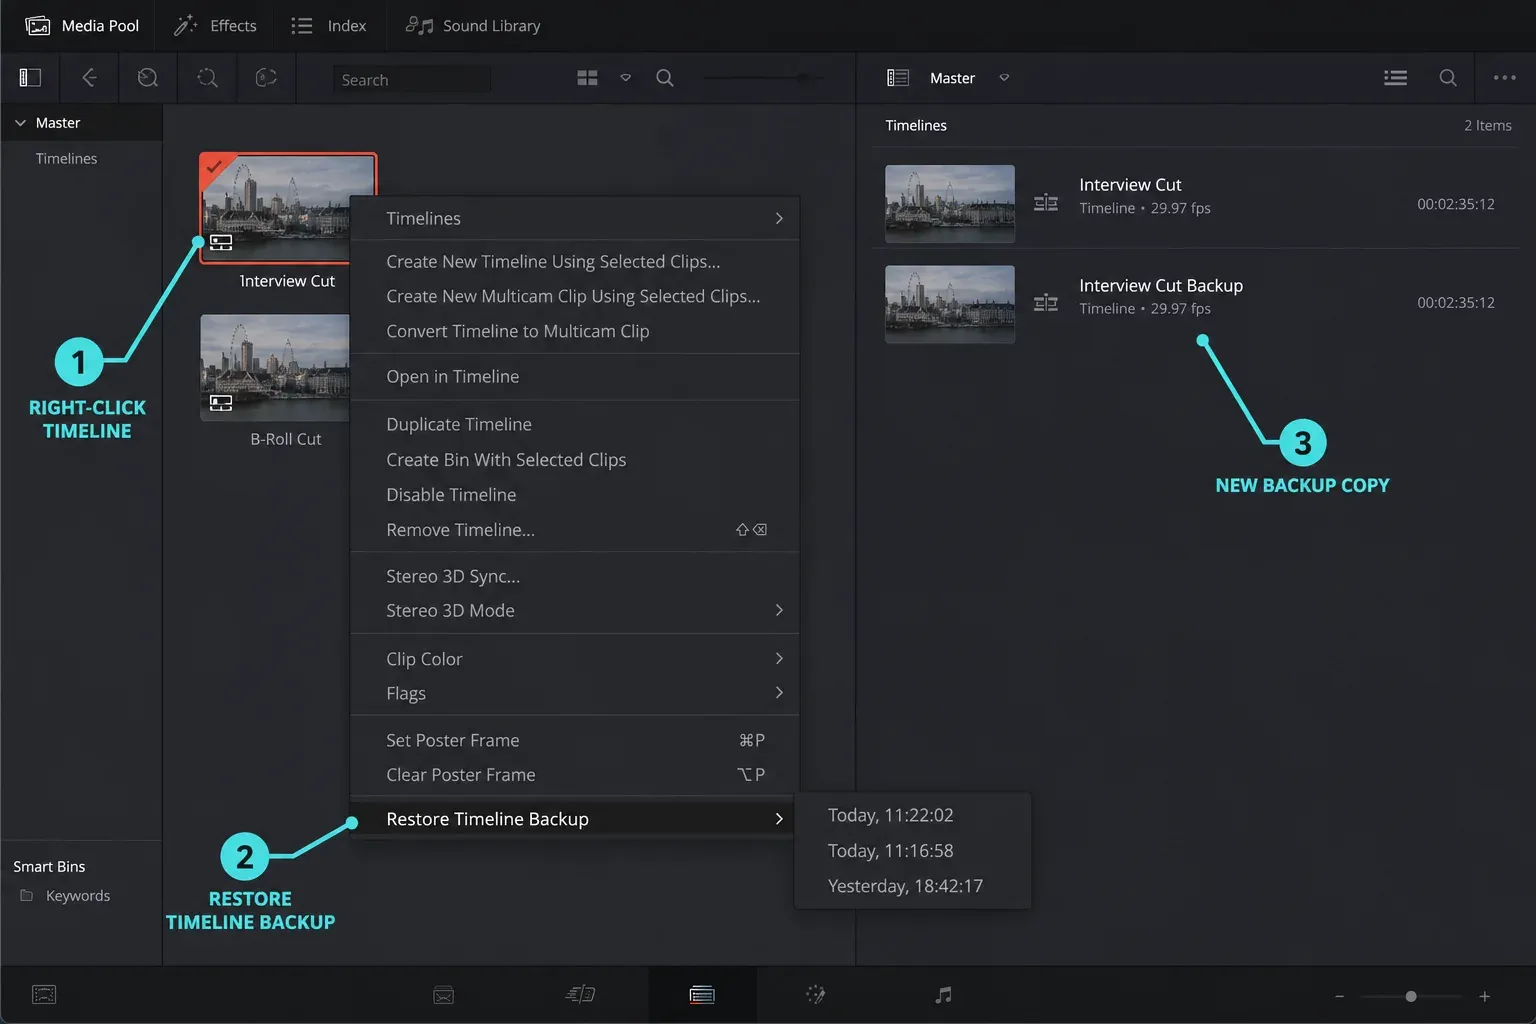
Enable Timeline Backups in Preferences > User > Project Save and Load. Project and Timeline Backups share the interval fields and backup location.
To restore, right-click the timeline in the Media Pool and choose Restore Timeline Backup. The selected snapshot returns as a new timeline with Backup appended, so the current timeline isn't overwritten. Resolve 21 can also compare a timeline with a backup from Compare with Timeline Backup.
A Timeline Backup is not a replacement for a whole-project backup. Keep Project Backups enabled too. Before a major restructure, duplicate the timeline or right-click it in the Media Pool and choose Create Timeline Backup to make a named restore point.
Export a DRP or archive the project with media
Live Save and scheduled backups operate inside Resolve's project system. When a project must exist as a portable item outside the library, export a DRP or create a DRA archive.
Export as DRP (DaVinci Resolve Project)
A .drp contains the project structure, timelines, edits, grades, Fusion work and settings, but not source media. A normal export also omits Gallery stills and LUTs; choose Export Project With Stills and LUTs in Project Manager when those assets need to travel with the project data.
With the project open, choose File > Export Project. From Project Manager, select Export or right-click the project and choose the required export variant. Save the resulting .drp somewhere outside the active library.
Use a DRP for a project-data checkpoint or a handoff to someone who already has the media. To test it, drag the DRP into Project Manager and import it under a unique name, preferably in a test library. Open its timelines and relink missing clips to your separately preserved media.
Export as DRA (DaVinci Resolve Archive)
A .dra is a folder archive containing the project and the media you choose to include. For an original-media backup, select Media Files. Proxy Media contains generated editing copies; a proxy-only archive is not a substitute for your camera originals.
In Project Manager, right-click the project and choose Archive (called Export Project Archive in some menus). Select a destination with enough free space. In the archive options, review Media Files, Proxy Media, Only include used media, Include Render Cache, Include LUTs and Include Gallery Stills before starting.
Leave Only include used media off if you need unused Media Pool clips too. Resolve reports missing or offline media at the end. The Resolve 21 archive options list Proxy Media, not an Optimized Media checkbox. Keep an independently verified copy of irreplaceable originals even after an archive succeeds.
A DRA does not automatically preserve every external dependency: fonts, plugin installers, licenses, third-party scripts, LUT installers, briefs and client documents need their own package. Resolve reports missing or offline media during archiving, so fix Media Offline before treating the archive as a verified handoff.
To test a DRA, first put the whole archive folder on the drive where its media should stay. Drag it into Project Manager, or use Restore/Restore Project Archive, and give the restored project a unique name. Open the timelines and check footage, audio, grades and effects.
Restoring a DRA adds the project to the library but leaves its media inside the DRA folder. Don't delete that folder after restoring. A successful project open alone doesn't prove that every clip or external dependency is present.
Save Settings You Should Configure Before Any Project
Use this as a baseline, then adapt retention and storage to the value and duration of the work:
- Live Save: on, then confirm the Edited indicator clears as changes are saved
- Project Backups: on, with retention matched to the work and a verified backup location
- Timeline Backups: on for active editing projects
- Before a major timeline restructure: duplicate the timeline or create a named Timeline Backup
- Before a Resolve or Project Library upgrade: back up the library and export important DRPs
- For handoff or archive: create a DRA and test-restored copy; preserve fonts, plugins and documents separately
Manual save is useful, but it isn't an additional backup generation. The stronger check is whether Live Save is on, scheduled backups are being written to the intended location, and a DRP or DRA can be restored on another system. An archive protects editable work; keep a separate finished deliverable using the Resolve export workflow.
Common Save Problems (and What's Actually Going On)
My project isn't showing up in the Project Manager
Open Project Manager and inspect the Project Libraries sidebar. Local, network and cloud libraries show different project sets, and a disconnected or signed-out library can make a project appear missing. Confirm the correct library before importing duplicates or moving folders.
I Can't Save: Resolve Throws an Error
Start with the exact error. Check free space and write access for a local library; for network or cloud libraries, also check the server connection, account and library availability. Preserve the current project and backup folders before attempting database repair. If the failure extends beyond saving, use the Resolve troubleshooting hub to match the symptom before changing project data.
I lost a project after a crash
After a crash, reopen the existing project and inspect what Live Save preserved. If you need an earlier state, load a Project Backup from Project Manager. For timeline-only damage, restore a Timeline Backup. Keep both the original project and the recovered copy until you've checked the edit.
If no usable scheduled backup exists, import the latest DRP or restore the DRA/library backup. A DRP cannot restore missing media, and a DRA can't restore dependencies that were never included, which is why the layers must be tested before a failure.
Frequently Asked Questions About Saving Projects
Does DaVinci Resolve save automatically?
Yes. Live Save is enabled by default and incrementally saves changes. Verify it under Preferences > User > Project Save and Load. Enable Project Backups separately when you need dated states that can be loaded without overwriting the current project.
Where does DaVinci Resolve save projects?
Working projects live in the active Project Library. In Project Manager, inspect the Project Libraries sidebar and the selected local library's details. A DRP is a separate project-data export; a DRA can include selected media. Neither changes where your active library lives.
What is the shortcut to save in DaVinci Resolve?
In the default Resolve preset, use Ctrl+S on Windows/Linux or Cmd+S on macOS for Save Project. Ctrl+Shift+S or Cmd+Shift+S opens Save Project As. Use a unique name: choosing an existing name can prompt you to overwrite it. Check custom mappings in Keyboard Customization.
What's the difference between a DRP and DRA file?
A DRP carries project data but no source media. A DRA is a folder archive whose contents depend on the selected Media Files, Proxy Media, cache, LUT and stills options. A proxy-only DRA does not replace your original-media backup. Preserve external fonts, plugins, licenses and documents separately.
Can I recover a DaVinci Resolve project after a crash?
Start with Live Save, then load a dated Project Backup or restore a Timeline Backup when only one timeline is affected. If the library itself is unavailable, restore a library backup or import a known-good DRP/DRA. Keep the damaged original untouched until recovery is verified.
Does DaVinci Resolve free version have autosave?
Yes. Live Save, Project Backups and Timeline Backups are available in the free version as well as Studio. Project Backups and Timeline Backups must be enabled and need a writable backup location.
