When a job fails in the Deliver page Render Queue, Resolve tells you that something broke and leaves the why to you. This page is about failed jobs and exports that stall while Resolve stays open. If the application closes or its whole interface freezes, work through the dedicated DaVinci Resolve keeps crashing guide as well.
Before you touch a single setting, copy the exact message, the timecode and the percentage, then find the smallest range that still fails. That order separates a bad clip or Fusion frame from a decoder, GPU, cache, storage or device problem, and it stops damaged output from slipping through unnoticed.
DaVinci Resolve Render Failed: Quick Reference Table
Find your wording in the first column, then run the safe test from the last one. Each row narrows the search, and one message can have more than one cause.
| Error message or symptom | What it narrows | First safe test |
|---|---|---|
| Render Job failed as the current clip could not be processed | Clip, Fusion/Text+, OFX, source frame, or cache | Note the timecode and render a short range around it |
| Error decoding full resolution media for [file] | File access, source integrity, codec support, or decode path | Verify the file and codec support; compare hardware decode only where available |
| Your GPU memory is full | VRAM pressure from resolution, nodes, NR, OFX, Fusion, or large stills | Bypass the heaviest process on the failing clip |
| Unable to Initialize GPU | GPU selection, processing mode, driver, or unsupported device | Check Memory and GPU preferences before changing the project |
| No error and the render barely moves | Very slow processing or stalled source/cache/destination I/O | Test a short range, check storage, and compare processing activity |
| Media Offline appears on specific frames | Missing media, storage interruption, damaged frames, or variable-frame-rate source | Verify the source; test a CFR transcode only for confirmed VFR |
| Render fails near the end or while writing cache | Late problem clip, destination space, cache space, or write failure | Check both drives and range-test the late section |
Render Job Failed: Keep the Error Check On
If Resolve reports that the current frame or clip cannot be processed, write down the timecode and test that range with error checking still enabled. Preferences > User > UI Settings includes Stop renders when a frame or clip cannot be processed. The Resolve 21.1 Reference Manual describes it as stopping the render when an encoding error is detected, and I rechecked this option and the other menu paths on this page against that manual on October 2, 2026. Switching it off may let a diagnostic job run to the end, but it won't repair the failed frame, so I'd keep it for a later test and never reach for it first.
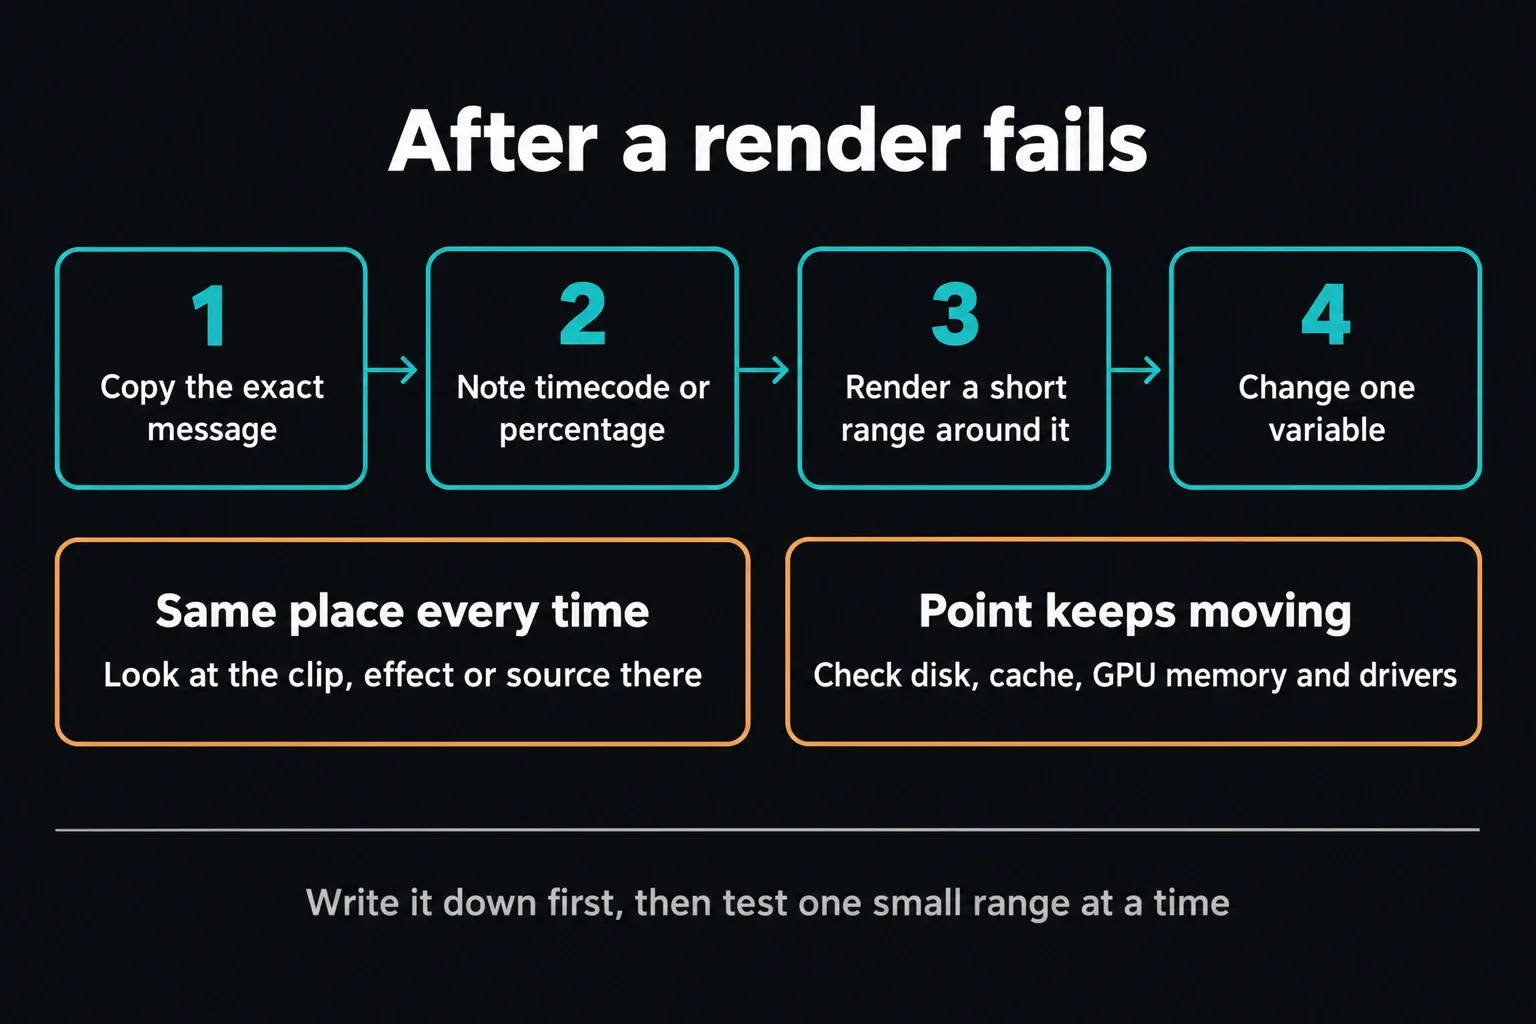
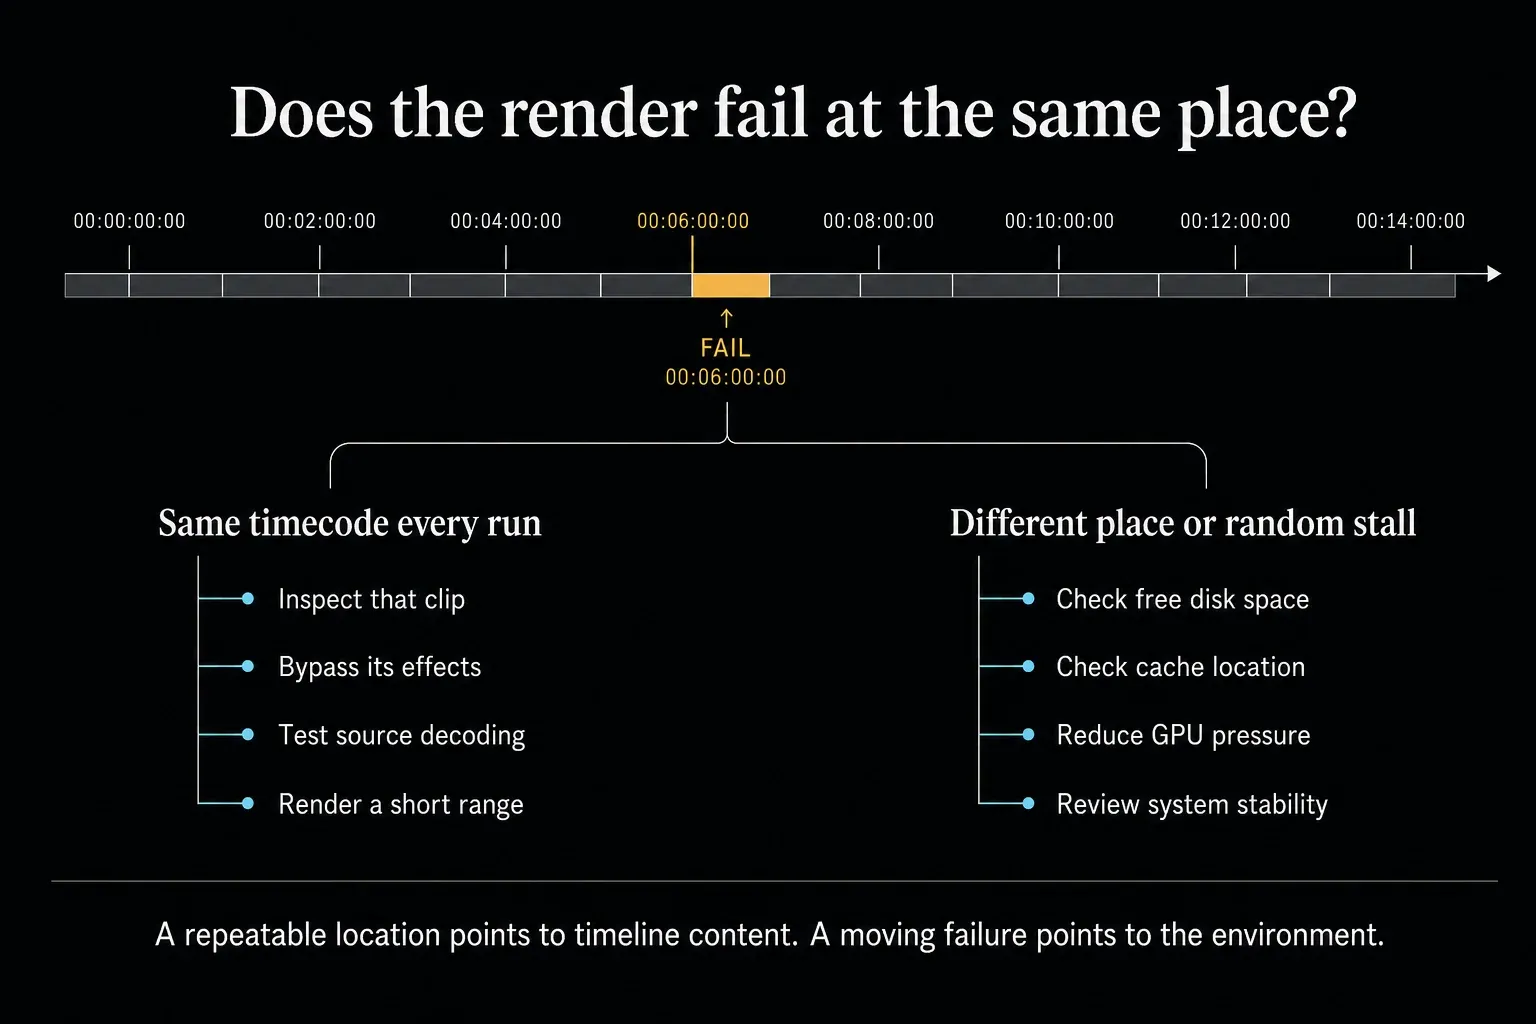
Switch the stop-on-error option back on after the test. If the diagnostic file finishes, step through the named timecode frame by frame and look for black frames, missing titles, frozen images, audio gaps and corrupt pixels. A progress bar that reached 100 percent because you silenced the warning is never a reason to deliver the file.
Fusion Composition Could Not Be Processed
For a named Fusion composition, choose Playback > Render Cache > Smart. If you'd like manual control, choose User, then right-click the failing clip and select Render Cache Fusion Output > On. Marking a clip On doesn't build its cache while the overall cache mode is Off. In User mode, Automatically cache Fusion effects in user mode is enabled by default under Project Settings > Master Settings, but check what your own project has. Wait for the affected cache indicator to turn blue before you test the range.
A blue cache bar alone doesn't tell the Deliver page to use that cache. To test the cached output, enable Use render cached images in the video render settings where it's available, pick a cache format suitable for the intended delivery, and inspect the result. If the composition can't produce valid cached frames in the first place, this route won't repair it, and your next job is to isolate the failing node or source.
If caching still fails, duplicate the timeline before you start pulling the comp apart. Bypass the last expensive node or OFX effect, render the same short range, and keep working backward until the range passes. Make sure MediaOut is connected and every source path used by Loader or MediaIn nodes is available. Rebuild only the node or template the test points to.
Error Decoding Full Resolution Media
When the message names a file, check that it still exists at that path, that it can be read, and that it plays through the reported timecode.
If Resolve has lost the source path, follow the Media Offline relinking checks. For a test, copy network or removable media to a local drive. With an H.264 or HEVC source, look under Preferences > System > Decode Options for Decode H.264/HEVC using hardware acceleration. If that control is there, turn it off for one comparison, save, restart when prompted, and retry the same range. Whether you see it depends on your platform, edition, hardware and codec profile, and a missing option isn't a fault by itself. An MP4 extension on its own guarantees nothing about support, so check the platform-specific codec guide for your system.
If software decoding gets through the range, suspect the hardware decoding path or the way it handles this media. That result still doesn't prove a corrupt file or a broken GPU. A failed test leaves source damage, an unsupported profile, storage access or an effect on the list. Put the setting back if it makes no difference. Before changing Resolve, the OS or a driver, save individual project and library backups and read the release requirements, and don't uninstall unrelated codecs or plug-ins on a hunch.
Full resolution media not found calls for an original-media availability check, separate from the decoder tests above. The wording alone doesn't prove the original file was deleted, and a proxy can keep playing while its original is unavailable. Reconnect the original and check its path before final output. Never let a lower-quality proxy quietly stand in just so the job finishes.
If the same frame fails in more than one player or a trusted transcoder, source integrity or an unsupported stream becomes the leading hypothesis. It stays a hypothesis until you've shown the file is actually corrupt. If a trusted transcoder can read the complete clip, make a new constant-frame-rate mezzanine file, replace only the problem clip in a duplicated timeline, and verify sync before the final render.
GPU Memory Is Full During Render
A GPU memory error tells you the card is under pressure, and usually several things add to it. Timeline and output resolution, temporal or AI spatial noise reduction, Resolve FX or third-party OFX, Fusion, motion blur and oversized stills can all contribute. Use the GPU Memory Full diagnostic for that exact message, compare the workload with the DaVinci Resolve system requirements breakdown, then isolate the failing clip before changing hardware.
Start with the failing clip and bypass these one at a time: temporal or AI spatial noise reduction if it's used, the heaviest Resolve FX or third-party OFX, large Fusion branches, motion blur and oversized stills. A lower-resolution test cuts processing demand and can support a memory-pressure hypothesis, but it doesn't prove the cause. Restore the required delivery resolution after the test.
Don't buy hardware on the strength of the error message alone. First show that the job passes when one memory-heavy operation is bypassed. If the final grade needs that operation, render the isolated shot to a suitable high-quality intermediate or move the job to a verified machine with enough supported GPU memory.
Unable to Initialize GPU When Rendering
Unable to Initialize GPU is a different problem from a full-memory warning: Resolve hasn't established a usable processing device. Open Preferences > System > Memory and GPU and check GPU Processing Mode and GPU Selection. Start with Auto. Manual mode exposes CUDA, OpenCL or Metal when the operating system and GPU support them. If the correct supported GPU is missing, close Resolve and update the vendor driver or the operating system before you force a manual selection.
On Windows laptops with integrated and discrete graphics, the operating-system Graphics preference can assign Resolve to the high-performance GPU. On macOS, GPU drivers arrive with system updates, so there are no separate NVIDIA or AMD installers to chase. Change one layer at a time so you know whether the failure came from Resolve selection, the OS assignment, or the driver.
Render Stuck With No Progress and No Error
A render that barely advances may simply be working through one expensive frame. Test a ten-second range with heavy NR, optical flow and Fusion bypassed one at a time, and write down which change helps. Watch CPU, GPU and disk activity, but low readings don't prove any particular fault. Check that source, cache and destination storage stay available. If playback is slow too, use the slow-playback diagnostic to separate decoding, effects and storage limits.
If monitoring is also broken or an audio device was recently disconnected, check Preferences > System > Video and Audio I/O > I/O Engine. The manual lists System Audio, Desktop Video, Fairlight Audio Accelerator and ASIO, with ASIO limited to Windows. Select an available device and work through the DaVinci Resolve no-audio checks. Save this check for renders that come with an audio symptom. A stall on its own doesn't mean Resolve is waiting for an ASIO device.
Render Fails Only On Certain Clips
When failures follow clips from one phone or camera, inspect the named source before you blame every clip from that device. Is it offline or sitting on unstable storage? Does the failing frame decode? Does the source use variable frame rate? Codec and delivery decisions belong in the DaVinci Resolve export settings guide; this section is only about isolating the source.
Don't change Clip Attributes to pretend variable-frame-rate media is constant. That only changes Resolve's interpretation of the clip, and the source timestamps stay exactly as they were. Confirm VFR with a media inspector before trying a constant-frame-rate transcode. Keep the original, transcode the complete clip to a supported editing format, and replace it only in a duplicated timeline. Verify duration, start timecode, frame rate, audio sync and color. Plenty of phone clips are constant frame rate, and different camera frame rates aren't automatically an error.
Render Failed Because the Disk or Cache Drive Is Full
Resolve can export to one drive while reading or writing cache on another, so check free space and write access on both. Check the target filesystem's file-size limits too, and whether a network or removable destination stayed mounted for the whole failed job.
Use Playback > Delete Render Cache > Unused to remove cache entries that no longer correspond to timeline clips or effects. In Resolve 21 the same submenu also offers All and Selected Clips. I'd pick the narrowest option, because any cache you delete has to be rebuilt. Moving the cache location doesn't move or repair an existing partial cache.
Render Fails at the Same Percentage Every Time
A failure at the same percentage every time often points to the same timeline region, though the job percentage is only an estimate. Note the reported timecode if you have it. If you don't, render a short range around the approximate point and inspect every clip, transition, Fusion comp, OFX process and source file that overlaps it.
When the failure point moves between attempts, widen the test to system state: GPU memory, driver stability, source or destination storage, cache space, audio I/O and hardware decoding. A moving point makes one deterministic bad frame less likely, though it doesn't prove every source clip is healthy.
How to Find the Exact Clip That Breaks the Render
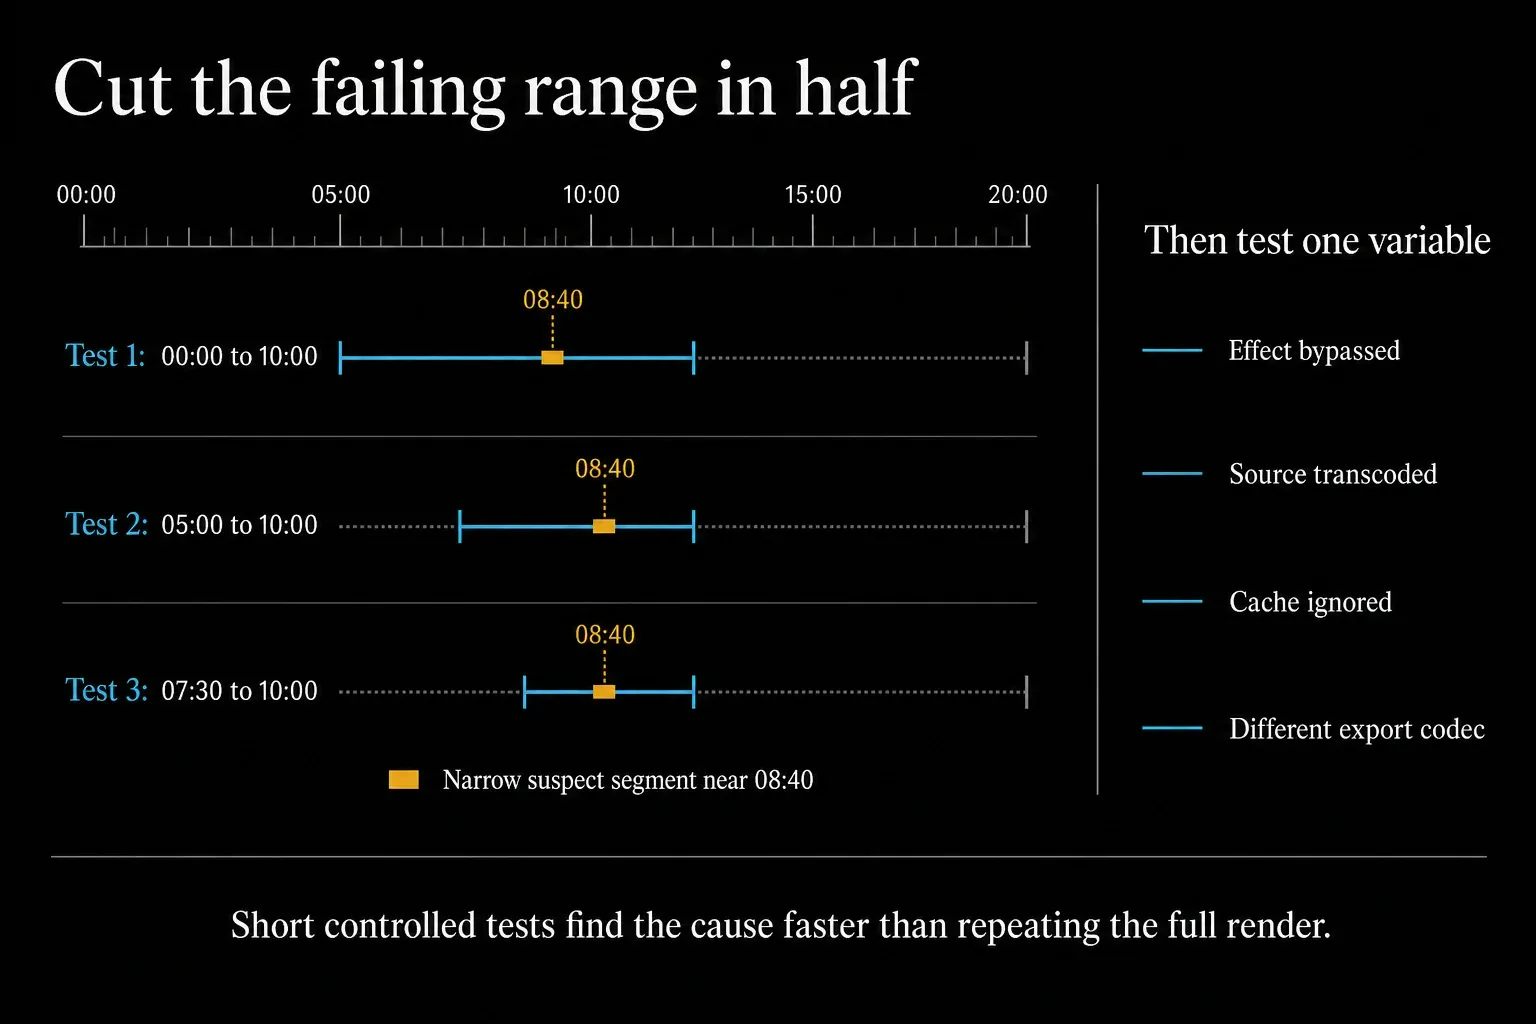
When Resolve gives you a timecode, test a few seconds either side of it. With only a percentage, estimate the timeline position and include handles, because transitions, retiming and Fusion can process frames outside the visible cut.
Set In and Out points around the suspect region and render that range. If it fails, halve the range and test again; if it passes, widen it toward the original boundary. Once you've isolated one clip, duplicate the timeline and bypass its Fusion comp, OFX, grade, retime or source replacement one at a time, each in a separate test.
If no short test isolates it, choose Help > Create Diagnostics Log on Desktop. Record the exact Resolve build and Free/Studio edition, OS, GPU and driver, source codec details, output settings and failure timecode. Support can do far more with a minimal project that reproduces the failure than with one more complete export attempt. Check Blackmagic’s current release notes before updating: the 21.1.1 notes warn that a project opened in 21.1.1 can't be opened in 20.3.2, even though the library remains compatible. Keep a pre-upgrade backup, and go through logs and project files for private paths or client material before you share them.
Render Failed FAQ
Why does DaVinci Resolve render fail at the same percentage every time?
A repeated percentage often means Resolve keeps reaching the same clip, frame, Fusion composition, OFX effect, cache section or source file. Test a short range around that point before you change project-wide settings.
Does DaVinci Resolve Studio render fail less often than the free version?
No edition guarantees a successful render. Free and Studio share core processing, while Studio adds different codec paths, noise reduction, AI effects and higher-end delivery options that can bring their own bottlenecks. Match the failure to the feature that's active, then use the free versus Studio breakdown to verify the edition difference.
Does restarting your computer actually fix a DaVinci Resolve render failure?
A restart can clear temporary GPU, driver and audio-device state, so it's a reasonable first diagnostic step. It isn't proof of a fix, though. If the same range fails again, go back to the exact message, the timecode and an isolated test, because a second or third restart won't tell you anything new.
Can "Use render cached images" be part of a final delivery after troubleshooting?
Only when the cache format is suitable for final delivery. Use render cached images lets the Deliver page pull cached media and skip recalculating that processing. The Resolve 21.1 manual recommends a format of the same quality as the output or better. Rebuild changed sections and inspect the final file. If the cache is lower quality, leave the option off and render from the original media.
For export format, codec, bitrate and platform delivery, go to the DaVinci Resolve Export Settings hub. For other playback, media and hardware failures, start from the Fix DaVinci Resolve troubleshooting hub.
